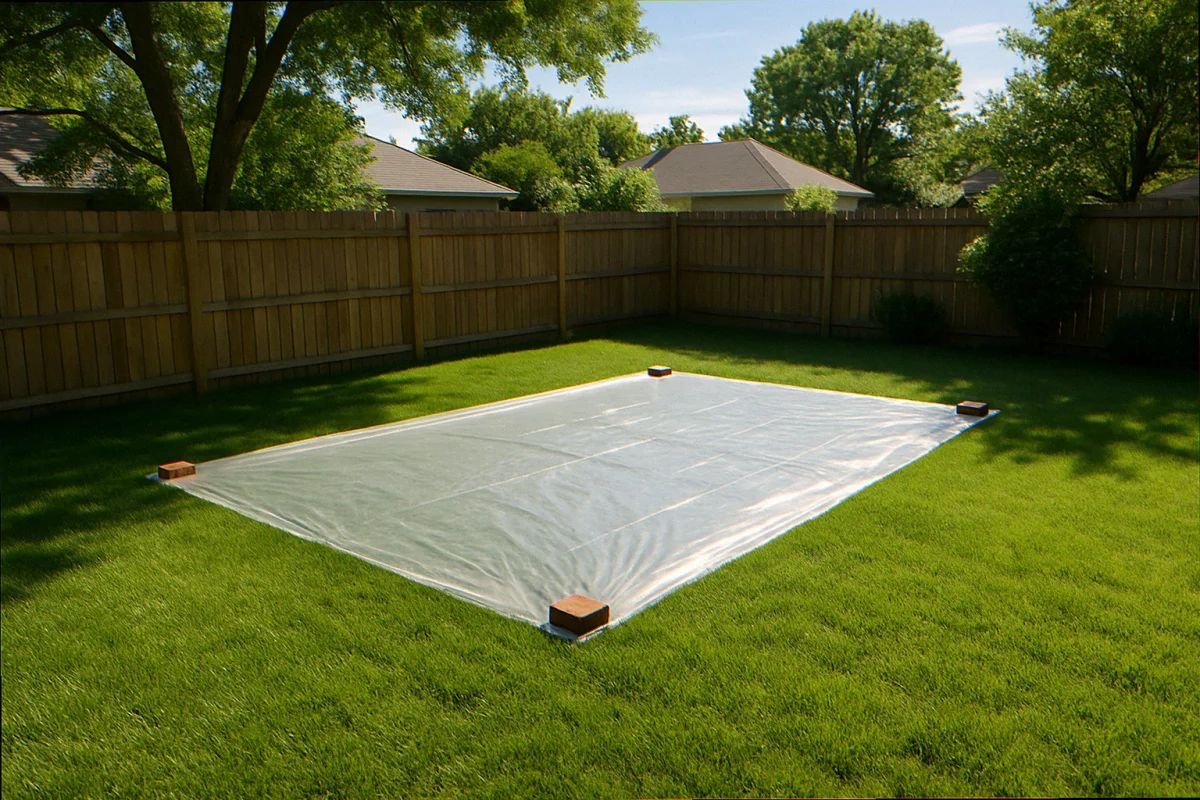
Solarizing a sunny patch of lawn from mid-June to early August will kill the grass and most surface weed seeds in six to eight weeks, leaving a soft, bare seedbed you can plant with native plugs by Labor Day. The method uses clear plastic, sun, and water. No herbicide. No digging. No sod cutter rental. The trade-off is that the patch looks like a swimming-pool cover for two months while it bakes.
A reader emailed last month with a sentence I have read a hundred times in different forms: traditional lawns are stupid, she wanted to be done with the mower, and she wanted her quarter-acre back. She had already tried cardboard once. The bermuda grass had punched right through it by July. She was three years into a slow rebellion against her front yard and had nothing to show for it except a half-dead patch the HOA had started photographing. This article is for her, and for everyone else stuck in the gap between wanting a homegrown meadow and actually getting one off the ground without spending a season on hands and knees.
“Traditional lawns are so stupid”: the real math of ripping out turf
The frustration is not abstract. A 1,000-square-foot lawn patch in a typical suburban yard burns roughly 14 to 22 gallons of gasoline per growing season just for mowing, depending on cut frequency and equipment age, according to EPA emissions inventory data. It supports almost nothing for pollinators. And it asks for irrigation, fertilizer, and your weekend in exchange for visual sameness with every other house on the block.
So the motivation is clear. The execution is where people give up. The standard answers all have failure modes the marketing copy rarely mentions. A sod cutter costs around $90 a day to rent and produces wheelbarrow-loads of grass-laden soil you then have to haul somewhere. Glyphosate kills the lawn in two weeks but also tags the soil microbes, the surrounding native seedlings if any drift, and the bee that lands on a wet leaf. Cardboard sheet mulching works on a lot of cool-season turf but reliably fails on three things: bermuda, established creeping fescue, and any lawn full of crabgrass seed banks. (We covered that gap in a separate post on smothering your lawn with cardboard for native plants.)
FREE: Wildlife Garden Starter Guide
Get our 12-page PDF with the 25 best plants for pollinators, simple habitat tips, and a printable checklist — all 100% free.
No spam. Read our Privacy Policy.Solarization is the fourth option, and the one most people skip because it requires committing a piece of ground to looking ugly for half the summer. That is the only real cost. In exchange you get sterilized topsoil, dead grass, suppressed weed seeds, and a planting window that opens exactly when fall rains return.
Why does cardboard smothering fail on bermuda and crabgrass?
Cardboard works by blocking light long enough that the grass crown exhausts its stored carbohydrates. That works on shallow-rooted, light-demanding turf species in cool weather. It does not work on rhizomatous warm-season grasses that can run a stolon two feet sideways and pop up past the edge of any cardboard sheet. Bermuda (Cynodon dactylon) is the classic example. So is zoysia. So is bahiagrass in the Southeast.
Crabgrass is a different failure mode. Cardboard does kill the existing crabgrass plants, but the seed bank is a separate problem. A single crabgrass plant produces 150,000 seeds in a year, and those seeds remain viable in the top two inches of soil for three to five years. The cardboard rots away by month four, light hits the soil again, and the crabgrass germinates faster than your native plugs can establish.
This is what makes June solarization different. At 110 to 125°F sustained in the top six inches of soil. Numbers documented by the UC IPM solarization guide. You cook both the living grass and a meaningful fraction of the surface weed-seed bank in the same six weeks. You do not get a perfectly clean seedbed. You get a seedbed clean enough that hand-pulling becomes a few minutes a week instead of a Sisyphean monthly chore.
How hot does the soil actually need to get?
The published thresholds are unambiguous. Solarization works when the top two inches of soil hold above 108°F for at least 30 cumulative days, and ideally above 120°F for several afternoons. Below 100°F you are mostly just suppressing growth, not killing crowns and seeds. Above 130°F you are killing soilborne pathogens like Fusarium and Verticillium too, which matters more for vegetable beds than native plantings but is a free bonus.
Reaching those temperatures requires four conditions to overlap. Full sun for at least eight hours a day. Air temperatures consistently in the mid-80s or above. Moist (not saturated) soil under the plastic, because water conducts heat down into the profile far better than dry air pockets. And clear, not black, plastic. Black plastic absorbs heat at the surface but does not transmit it to the soil, which is the opposite of what you want.
In USDA hardiness zones 6 and 7, the practical solarization window runs from mid-June through mid-September. In zone 8 and warmer you have from May through October. In zone 5 you really do have to start by July 1 and accept that the lower-end of the kill range. North of zone 5, sheet-mulching or sod-cutting is honestly more reliable than waiting for the three weeks of legitimate heat you might get.
A six-week solarization plan, week by week
This is the calendar I hand to people who email me about lawn conversion in June. It assumes a 100 to 400-square-foot patch in zone 6 or 7 starting on or near June 15. Adjust dates south or north by roughly two weeks per zone.
| Week | Action | Tools / cost |
|---|---|---|
| Week 0 (mid-June) | Mow lawn to one inch. Rake debris. Mark the bed outline with a hose or rope. | Existing mower. Free. |
| Week 0 + 1 day | Water deeply for one hour with a sprinkler. Soil should be wet six inches down, not puddled. | Garden hose. Free. |
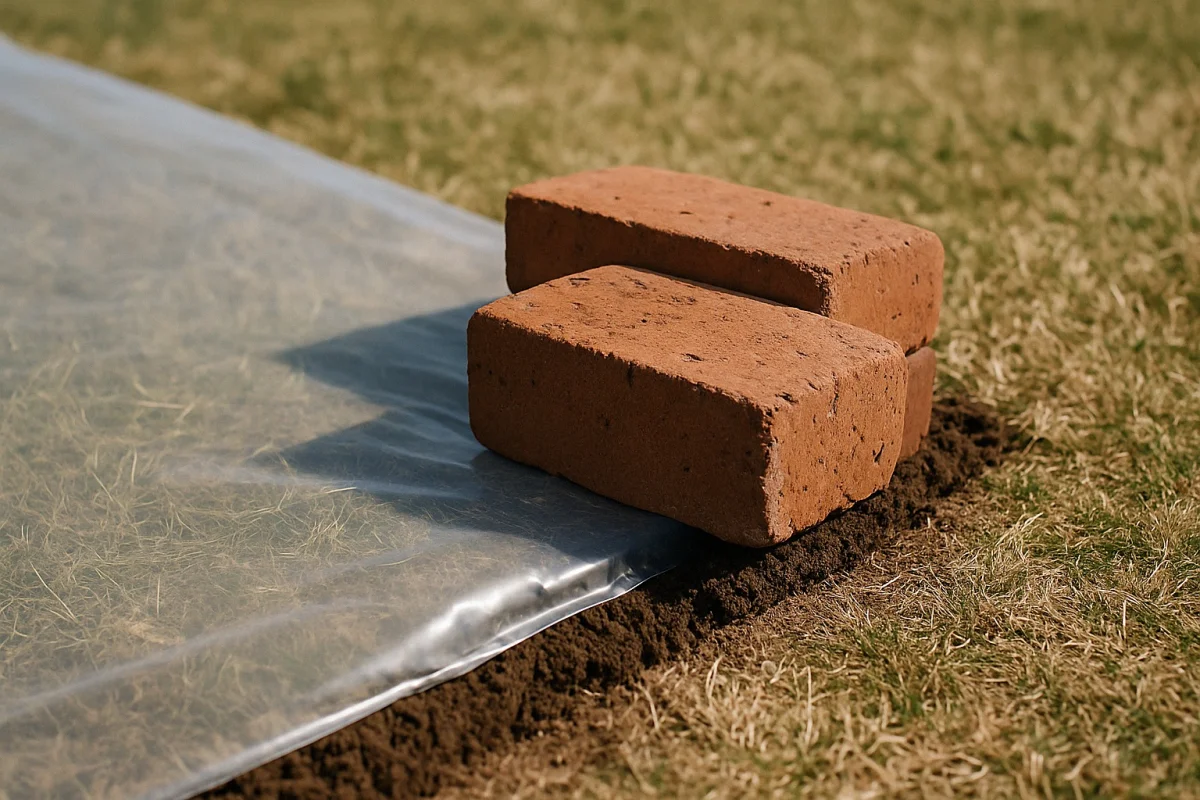
| Week 0 + 2 days | Lay 2 to 4 mil clear painters’ plastic. Stretch tight. Weight edges with bricks or bury edges in a four-inch trench. | 10 ft x 25 ft roll: $22 at Home Depot. Bricks: $0 if you have them. |
| Weeks 1 to 6 | Walk past. Do nothing. Re-seal any wind-lifted corner immediately. Check for condensation on the underside. That means it is working. | Time only. |
| Week 7 (early August) | Pull plastic in the evening. Grass should be straw-yellow and brittle. Rake lightly. Do not till. Tilling brings new weed seeds up. | Rake. Free. |
| Week 8 (mid-August) | Plant native plugs or sow seed. Water in. Mulch lightly with shredded leaves. | Plugs: $2-$4 each from local native nursery. 50 plugs covers 200 sq ft at 18-inch spacing. |
Three details matter more than the rest. First, the soil really does need to be moist before the plastic goes down. Dry soil under plastic acts as an insulator. Second, the plastic needs to be flush with the soil, not floating an inch above it on stems and debris. Air gaps drop the peak temperature by 15 to 25 degrees. Third, if a corner lifts in a thunderstorm, fix it within 24 hours or you lose a week of kill time on that section.
For spacing the plugs after the plastic comes off, I lean on the guidelines we walked through in how far apart to plant natives in a new bed. The short version: 12 to 18 inches for most perennials, closer if you want full closure by year two and have the budget for it.
What are the most common solarization mistakes?
The technique is genuinely simple, and that is exactly why people botch it. Most of the failure modes are some version of “I almost followed the directions.” Five mistakes account for nearly every solarization project that does not work.
Starting too late in the season. A July 15 start in zone 6 gives you maybe 45 days of reliable heat before the soil-temperature window closes. The grass will look dead from the top, but the rhizomes survive and the patch resprouts in spring. If you missed the June 1 to July 1 start window, switch to cardboard-plus-mulch in August or wait for next June. Do not solarize in late July and hope.
Using black plastic. Black plastic looks similar at the hardware store and is sometimes sold as a “weed barrier” by people who do not know the difference. It absorbs solar energy at the surface, gets hot to the touch, and conducts almost none of that heat into the soil. The lawn beneath stays alive. You want clear, transparent, two-to-four-mil plastic that lets visible light through to be absorbed by the soil itself.
Leaving air gaps under the plastic. Tall grass stems, rocks, and uneven raked debris create small air pockets between the plastic and the soil surface. Air is a thermal insulator. Every quarter-inch gap is a chunk of soil that does not reach the kill temperature. Mow short. Rake smooth. If the bed has divots or root crowns sticking up, drag a bow rake across it before laying plastic.
Skipping the deep watering step. Dry soil under plastic peaks at maybe 95°F. Moist soil under the same plastic, same sun, hits 125°F. Water conducts heat down into the profile and also accelerates the biological breakdown of crowns and seeds. If you forgot to soak before laying, pull a corner back, run a sprinkler for 45 minutes, and reseal.
Pulling the plastic too early. Six weeks is the floor, not the target. Eight weeks gives much more reliable kill on the harder species and on the seed bank. If you have the patience, plan for the full eight. Set a calendar reminder. Resist the urge to peek at week four. Every time the seal breaks, the cumulative heat resets a little.

What should I plant after the plastic comes off?
The bed that comes out from under solarization is unusual. It is essentially sterile in the top inch. Weed-seed-suppressed but also microbially reduced. The good news is native plants tolerate bare ground far better than turfgrass does, and the soil microbial community rebounds within four to eight weeks if you stop disturbing it. The bad news is that this is the moment when people undo their own work by buying a “wildflower mix” of mostly annuals and non-natives.
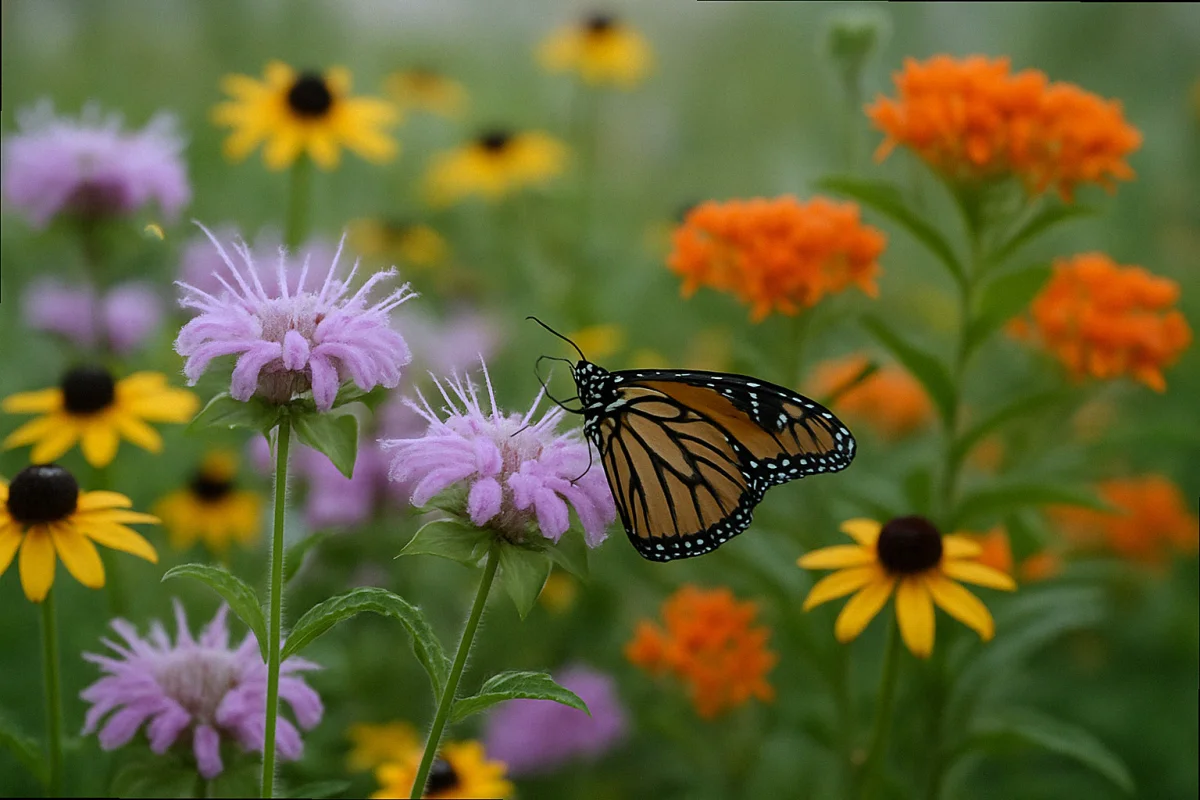
For an August planting in zones 6 to 7, pick perennials and grasses that establish in fall and tolerate occasional dry spells. A reliable starter palette: little bluestem (Schizachyrium scoparium), prairie dropseed (Sporobolus heterolepis), black-eyed Susan (Rudbeckia hirta or R. fulgida), wild bergamot (Monarda fistulosa), butterfly weed (Asclepias tuberosa), aromatic aster (Symphyotrichum oblongifolium), and either common yarrow or moss phlox depending on whether you want a sprawler or a mat.
Avoid the seed-mix trap. The label on a bag of “wildflower seed” rarely tells the truth about what is in it. We broke down how to read those labels in wildflower seed mix labels and how to spot the invasive fillers. If you want to seed rather than plug, source from a regional native seed supplier with explicit county-level origin data, or stick to plugs for the first patch.
On where to actually find the plants: local nurseries first, big-box only when you know what to look for. Where to buy native plants when nurseries sell out and how to buy real natives at Lowe’s and Home Depot without getting burned both cover the pragmatic supply problem most converters hit by mid-August.
One last item: if you live where deer pressure is heavy enough to nuke a young bed, weight the palette toward the deer-resistant species we list in 15 deer-resistant native pollinator plants. Mountain mint, anise hyssop, and the asters are generally safe; new tender hosta-ish things are not.
Will the neighbors complain about the plastic sheet for six weeks?
Probably one of them will. This is the part of the workflow that nobody talks about, because it is uncomfortable and not very Instagram-friendly. A 200-square-foot patch of clear plastic in a front yard reads to most suburban eyes as “construction project gone wrong.” It is the most visually offensive phase of any lawn conversion, and it is the phase that often triggers a courtesy letter from an HOA aesthetics committee.
Three things help, in order of effectiveness.
Pick the patch behind the house first. If you have any back yard at all, do the first solarization there. By year two you will have something tangible to point to when you propose the front-yard conversion, and the social cost of the second patch drops to almost zero. Most people skip this and do the front first because that is the part they hate looking at. Be patient.
Tell the neighbors before you lay the plastic, not after. A 30-second conversation across the property line, “I’m killing this section of lawn to put in pollinator plants this fall, it’ll look weird until August”. Converts most “what is she doing?” reactions into “oh, neat.” The people who are going to complain are still going to complain, but the bystanders shift sides.
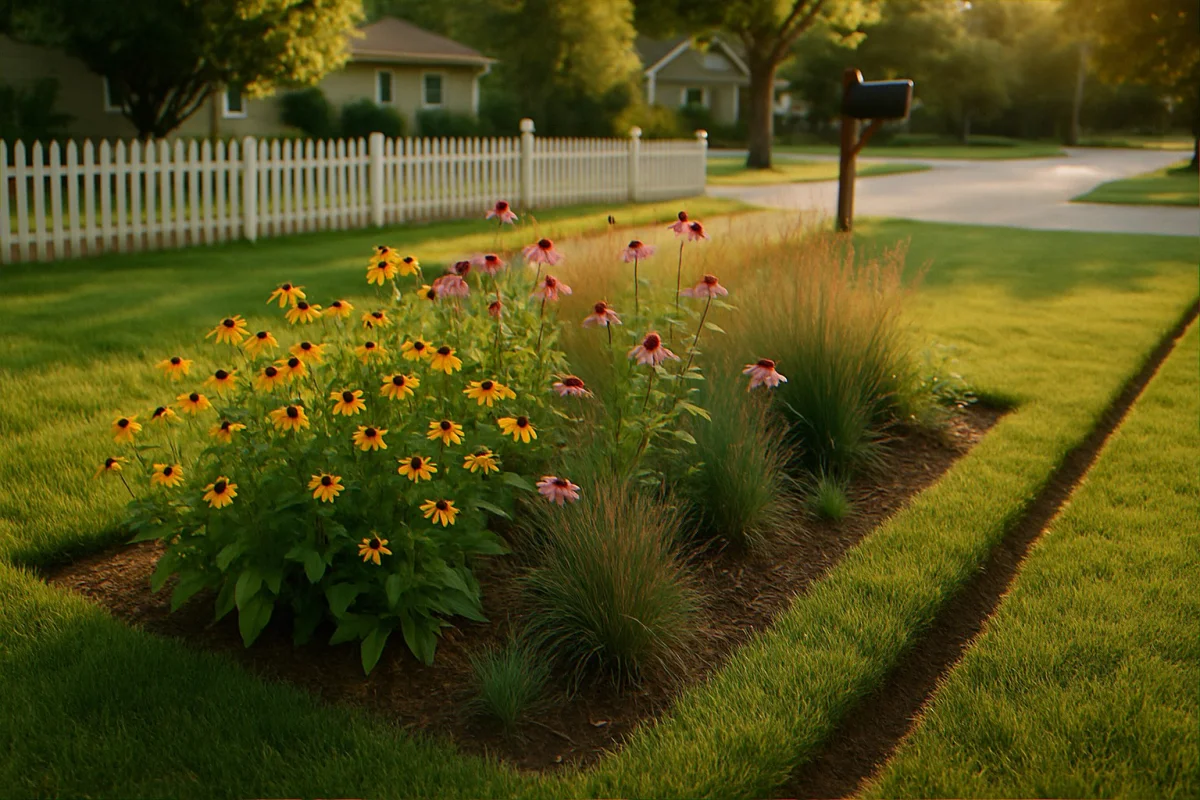
Frame the bed with a mowed edge and a clean border. The minute the plastic comes off, mow a two-foot strip of lawn around the bed and edge it with a spade-cut trench or a strip of steel edging. A wild bed inside a tidy frame reads as intentional. The same bed without the frame reads as neglect. The post on curb appeal for native gardens and HOA-friendly designs covers the visual grammar in more detail, and if the letter has already arrived, our piece on what to do when the HOA sends a letter walks through the response.
For a deeper read on why suburban perceptions of “wildness” track so badly with ecological health, the Wild Ones essay on pollinator lawns is the cleanest one-page explanation I have found.
What does your yard actually look like by next May?
A June 15 solarization start in zone 6, planted in mid-August with 50 plugs over 200 square feet, produces a bed that looks like this by the following May.
The black-eyed Susan and Rudbeckia plugs come back at roughly 80 percent. The little bluestem clumps will have doubled. The butterfly weed sends up its first real flush. The bergamot is leafy but probably not flowering yet. That is a year-two performer. The aster basal rosettes are visible but small. By June, the bed is roughly 40 percent closed canopy. By September of year two it is 90 percent closed and you will be hand-pulling exactly one type of weed instead of the dozen that haunted the lawn era.
Crucially, the gas mower stays in the garage. You will mow the surrounding lawn strip and the path edges, but the 200-square-foot bed is now a quiet hum of pollinator traffic that requires roughly 20 minutes a week from May through August: spot-water in droughts, pull the occasional crabgrass that crept in from the lawn edge, deadhead if you like the look. The Sisyphean labor pattern is broken.
By year three the bed sets its own seed and the plugs you bought become the matriarchs of an expanding patch. You can begin propagating into the next conversion section for free. That is the moment people stop describing themselves as gardeners and start describing themselves as stewards. It also tends to be the moment a previously skeptical neighbor asks how they could do something similar in their own yard. That, more than anything else, is what changes the local social pressure: not arguing with the HOA, but showing them.
For the early weed-vs-seedling stretch of the first spring, the post on telling native seedlings from weeds before you pull them is the one I send to first-year converters more than any other.
FAQ
Can I solarize in spring or fall instead of summer?
Not effectively. Solarization needs sustained soil temperatures above 108°F in the top two inches, and that only happens with intense midsummer sun. Spring and fall give you weeks of warm-but-not-hot weather, which suppresses grass without killing it. You will pull the plastic in October and find the lawn perfectly alive underneath.
What thickness of plastic should I use?
Two to four mil clear painter’s plastic. Thinner than two mil tears too easily. Thicker than six mil absorbs too much sunlight at the surface and lowers the soil temperature. The cheap clear stuff at the hardware store is correct for this purpose. Do not use black plastic, landscape fabric, or anything UV-stabilized that blocks sunlight transmission.
Do I need to till the soil before laying plastic?
No, and you should not. Tilling brings new weed seeds from deeper in the soil profile up to the kill zone, then lifts them back out of reach. Mow short, water, lay plastic. The dead grass becomes the first round of organic matter for the new bed.
Does solarization kill earthworms and beneficial soil life?
Earthworms move down out of the kill zone within a day or two and return to the top six inches within a few weeks of the plastic coming off. Surface-dwelling springtails and some mycorrhizal fungi take a real hit, but the community rebounds within two months if you stop disturbing the soil. Planting plugs (which carry their own root-associated microbes) accelerates the recovery substantially.
What if my HOA prohibits visible plastic sheeting?
Read the covenant carefully. Most prohibit “tarps” or “permanent visible structures,” not temporary horticultural sheeting. If the language is broad, do the back yard first and use cardboard sheet mulching plus a one-foot soil layer for the front. The visual is more acceptable and the conversion timeline stretches from one season to two.
Want More Wildlife Garden Tips?
Join 5,000+ nature lovers getting our weekly tips on creating wildlife-friendly gardens.
No spam, unsubscribe anytime. Privacy Policy
Emma Harrington
Emma Harrington is a wildlife habitat researcher and content editor with a passion for backyard conservation. She has spent over a decade translating ecological science into practical tips anyone can follow — from selecting native plants to building wildlife-friendly habitats. Her work focuses on helping homeowners transform ordinary yards into thriving ecosystems for bees, butterflies, hummingbirds, and other beneficial wildlife.