If you’ve ever bought a “bee hotel” from a garden center. The kind with the cute painted roof and bundles of hollow bamboo. You may have wondered later whether the bees were actually using it, and whether it was doing what the package promised. That quiet uncertainty turns out to be well-founded, and it comes up often in native gardening circles.
This guide walks through what native bee researchers, the Xerces Society, and long-time mason bee keepers have slowly come to understand about what a mason bee house really needs to do. You’ll see the three designs that work well, seven common designs that tend to fail the bees, and the simple, free alternative that works better than most commercial houses. It’s also a realistic look at the year-over-year care a bee house needs, which almost no packaging mentions.
There’s no guilt in this. Most of us bought the popular bamboo tube hotel at some point, hung it up, and felt good about helping pollinators. The biology of how solitary bees nest is simply not something garden centers tend to explain, and once you see it, the picture becomes a lot clearer. And your next bee house decision becomes a lot easier.
FREE: Wildlife Garden Starter Guide
Get our 12-page PDF with the 25 best plants for pollinators, simple habitat tips, and a printable checklist — all 100% free.
No spam. Read our Privacy Policy.The hidden problem with most commercial bee houses
The concern around bee hotels has shifted how many gardeners perceive their value. This change in perspective seems to stem from a growing awareness about the effectiveness and safety of these structures in supporting bee populations, which has led to more thoughtful discussions.
“Friends, please don’t use bee hotels. They are known to do more harm than good for bees by harboring disease and predators. Instead, please just leave your stems like this: use your old stems.”
What’s behind that warning is a problem of biology rather than brand quality. Mason bees, leafcutter bees, and most cavity-nesting native bees lay one egg per chamber, seal it with mud or leaf pulp, and leave it. That sealed chamber has to survive up to ten months before the next generation emerges. Long enough for pollen mites, chalcid wasps, and fungal diseases to find the nest and lay their own eggs or spores inside.
In the wild, bees nest in scattered locations: one stem here, a beetle hole in a dead log over there, a hollow raspberry cane fifty feet away. Parasites and predators have a hard time finding enough hosts to build up a population. A traditional bee hotel with forty holes in a single wooden block flips that ecology on its head. Another gardener put it plainly:
“Basically you’re creating a smorgasbord for predators and parasites because all the nests are right next to each other. Because of this, disease, mold, etc. also spreads faster.”
The issue of predators often comes up, and a thoughtful reflection from a local eco-enthusiast has lingered in my mind.
“I had a bee hotel for a couple years and absolutely loved it. Then one day I saw a Downy woodpecker feasting on it. I took down the hotel and only use standing stems now.”
What makes commercial bee houses mostly problematic isn’t the concept. It’s that the concept only works if the nesting chambers can be cleaned each year. That one detail changes everything, and most off-the-shelf houses don’t allow it.
What mason bees actually need
To understand why cleanability matters, it helps to walk through what a mason bee’s life looks like inside a nesting tube.
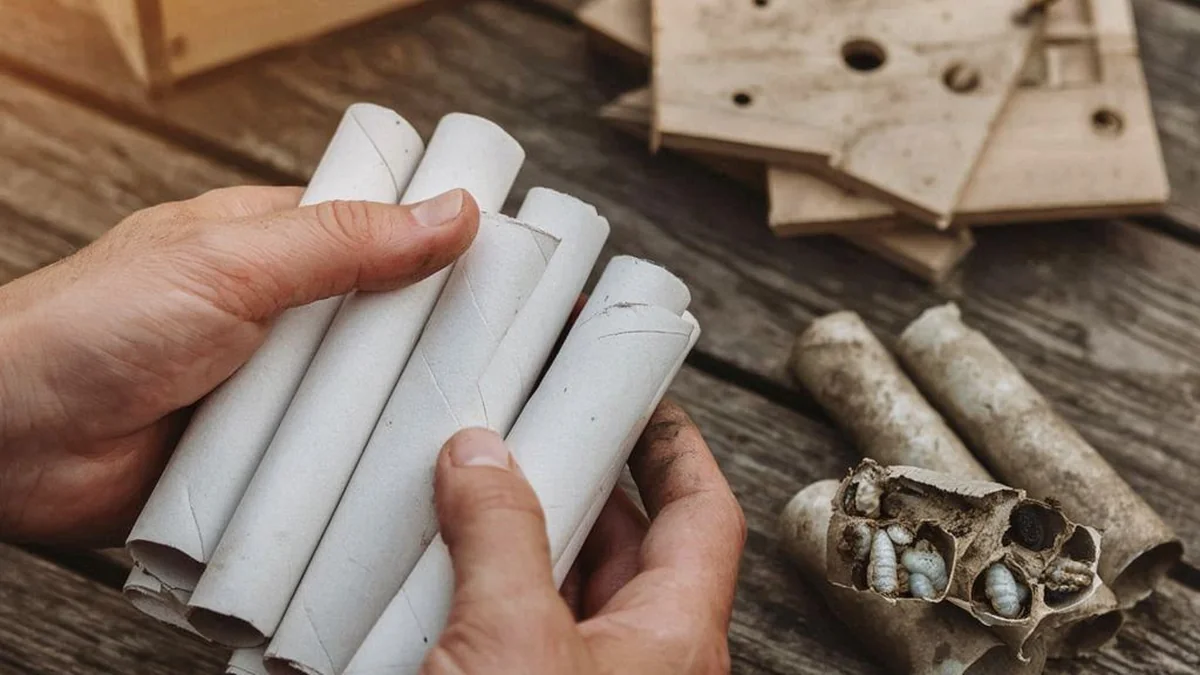
A female mason bee, once she finds a tube of the right diameter. Usually around 5/16 inch (about 8 millimeters). Flies out to collect pollen and nectar. She packs that food into the back of the tube, lays a single egg on it, seals the chamber with a mud wall, and starts the next chamber. She repeats this until the tube is full, ending with a thicker mud plug at the entrance. Then she moves on.
Inside each chamber, a larva hatches, eats the pollen, pupates, and waits. Depending on the climate, that waiting period lasts six to ten months. During that time, parasites can enter through the seal, pollen mites can accumulate, and fungal pathogens can bloom in the humid interior.
In a well-managed bee house, the gardener opens the tubes in late fall, inspects the cocoons, discards any that look compromised, cleans the tubes or liners, and stores healthy cocoons in a cool place until spring. That’s what native bee keepers have been doing for decades. And it’s the reason specialty bee suppliers (like Crown Bees) sell replaceable cardboard tubes and paper liners as standalone products.
The practical implication is simple: a bee house that can’t be opened and cleaned is a bee house that will accumulate parasites over time. Not in year one, necessarily. But by year three or four, the house becomes more problematic than helpful.
A few design features make cleanability possible:
- Removable paper liners or cardboard tubes that slide in and out of the housing
- Tubes at least 5 inches deep (shorter tubes produce only male bees and skew the gender ratio)
- A housing that separates (wing nuts, screws, or removable panels) so the entire interior can be accessed
- Hole diameters matched to native species (around 5/16 inch for most cavity-nesting natives)
A gardener summed up the deeper-tube point nicely:
“I had my son carve a few of them deeper to approach 5 inches when they were shallow. I do wish the overall footprint was a bit larger to make them 5+ inches readily.”
Once you know what to look for, choosing a bee house becomes a shorter list of options.
Three bee house designs that work
The Wildlife World Interactive Wooden Bee House
Many people have mentioned a particular design that stands out in long-term evaluations: a cedar frame featuring multiple separable “floors” secured with wing nuts, allowing for easy disassembly.
“I love the ease of being able to clean it each season without having to add rolled paper inserts. It’s so easy to clean out and put together again.”
And another:
“It is easy to unscrew the wingnuts to separate the ‘floors.’”
A few buyers noted that some units arrived with rougher wood than expected, or with a marginal top row that measured under the 5-inch minimum. Checking the hole depth on arrival is worth the two minutes. If any tubes are too short, they can be blocked and supplemented with a separate set of cardboard tubes. Otherwise, it’s a solid long-term choice for a gardener willing to do annual fall cleaning.
Replaceable cardboard tube systems
This is less of a specific product and more of a category. Any bee house that uses individual cardboard tubes. Not glued or bundled bamboo. Allows the tubes themselves to be the disposable component. You replace them each fall, which means the parasite load never has a chance to build up:
“I like how each tube is smooth cardboard that you can just toss out when you’re doing post-winter cleaning. I like that it seems easy to clean.”
The trick is making sure the tubes slide freely in and out of the housing. If they’re glued in place, the cleanability benefit is lost. Replacement tubes typically cost around $5–10 per season and are widely available from native bee suppliers.
A drilled wooden block (do-it-yourself)
For anyone comfortable with a drill, a homemade house is often the most controllable option. A solid, untreated cedar block, drilled with 5/16-inch holes at a depth of 6 inches, with a removable back panel held on by screws, gives you everything that matters: the right diameter, adequate depth, and the ability to open the back for cleaning.
Annual maintenance means unscrewing the back, gently pushing out the season’s cocoons, cleaning the interior with a mild 1:10 bleach solution, rinsing well, and letting it dry completely before reassembly. That process takes about twenty minutes per year.
The cost is near-zero if you have scrap wood and a drill. It’s the most labor-intensive of the three options up front, but the lowest-cost long term.
Seven common designs that tend to fail the bees
Not every bee house on the market is a good choice. Several common designs, while visually appealing, tend to harbor disease, fail mechanically, or simply don’t allow the maintenance bees need. Being aware of these patterns before buying saves a lot of disappointment later.
| Design pattern | Why it falls short |
|---|---|
| Bamboo tube hotels | The hollow interior of a bamboo stem can’t be cleaned or replaced. As one community resource puts it, “Bamboo is really bad for bees.” |
| “Penthouse” roof designs | The decorative roof often creates a top row of holes that are only 2.5 inches deep. Too shallow for female bees to develop. Gender ratios skew heavily male. |
| Craft-kit quality assembly | Some houses sold as children’s projects arrive with nails that bend during assembly: “The nails went fine through the pilot holes but started bending like crazy when not lined up with the holes.” |
| Fixed or glued-in tubes | If the tubes can’t be removed, they can’t be replaced. Year one they work; year three they’re a source of accumulated pathogens. |
| Rough or splintering wood | Cracks and splinters trap mites, making even a housing with removable tubes hard to fully sanitize. |
| Large “apartment complex” hotels | Houses with 40+ holes in close proximity concentrate both hosts and pathogens. Smaller houses in several locations tend to produce healthier populations. |
| Sealed houses with no access panel | Any house without wing nuts, screws, or obvious hinges can’t be opened for maintenance. |
None of this is about bad intentions from the companies that make these. It’s about the difference between a product designed to look nice on a shelf and one designed around the actual lifecycle of the bees inside.
The free alternative Xerces recommends
Here’s a quiet truth about bee houses: native bees were doing fine long before we started building them shelters. The single most effective thing most gardeners can do for native bees costs nothing and requires no purchase.
Three simple practices make a real difference:
Leave cut stems standing. In late winter or very early spring, cut back plants like joe-pye weed, raspberry canes, hydrangea, and sunflowers. But cut them to about 12 to 18 inches rather than all the way down. The hollow or pithy stems left standing become natural nesting cavities. A gardener described what happened in their yard:
“It wasn’t until I saw some infographic last winter about leaving 12″+ cut stems for bees to nest in that I clipped these off this spring instead of pulling the whole thing. Sure enough, the past few days I’ve seen tiny wasps hovering over the cut stems and hanging out inside.”
Leave dead wood on the property. A fallen log or a small brush pile at the back of the yard becomes a habitat for solitary bees that drill their own tunnels:
“You can plant things with hollow canes like joe-pye weed, raspberry, hydrangea, turtlehead, etc., and leave stumps/logs for bugs to drill into.”
Keep a patch of bare earth. A surprising number of native bee species. Roughly 70%. Actually nest in the ground, not in tubes at all:
“Different native bees also nest in different ways and majority of them are actually ground nesting so they need a little patch of soil, sand, or leaf litter to burrow into.”
A three-by-three-foot patch of unmulched, lightly-sandy soil in a sunny corner of the yard can attract mining bees, digger bees, and sweat bees. Species no commercial bee house ever hosts.
The full Xerces Society recommendation is worth reading in their own native bee gardening guide.
When and how to clean a bee house
If you do go with one of the three working designs, fall cleaning is what keeps the house functioning year after year. The timing window is generally October through November in most zones, after the bees inside have fully pupated and before deep winter cold.
Here’s the basic process:
- Open the house. Unscrew wing nuts, remove the back panel, or pull out the tube tray. Whichever applies.
- Inspect the cocoons. Healthy mason bee cocoons are a tough, leathery, dark brown. If you see a greasy or sticky residue, that’s usually a sign of pollen mites, and those cocoons should be discarded.
- Store healthy cocoons. A small ventilated container in a garage refrigerator at 35–40°F keeps them dormant until spring. The routine, as one local volunteer described it, runs like this: “Will open early fall to remove and clean cocoons and store in garage fridge.”
- Clean the housing. A diluted bleach solution (1 part bleach to 10 parts water) on the interior, followed by a thorough rinse and complete drying, prepares it for the next season.
- Replace any consumable components. Cardboard tubes and paper liners get thrown out and replaced with fresh ones.
- Return the cocoons to the yard in early spring. Place them in the rebuilt house or in a dry, sheltered spot when your first native plants begin to bloom.
The whole process, for a modest bee house, takes about half an hour per year. That’s the only maintenance that separates a bee house that helps from one that slowly becomes a problem.
A realistic look at year one
First-year results from any bee house vary a lot. Some gardeners attract a dozen nesting females in the first spring; others wait two full seasons before much happens. A few factors make the biggest difference:
- Placement matters. Face the house roughly east to southeast, mounted 3–7 feet off the ground, with the entry holes catching morning sun and protected from driving rain.
- Nearby food matters more. A bee house without native flowering plants within about 100 feet of it tends to stay empty. Mason bees especially need early-spring blooms like wild plum, redbud, or spring ephemerals.
- Patience matters most. Native bee populations in any given yard build slowly. Year one is reconnaissance for them; year two is nesting; year three is when the house usually fills.
And if the first year is quiet, that’s normal. The yard is still sorting out whether it has the food, water, and shelter to support a local population. Supporting that ecosystem. With native plants, water sources, and the simple practices above. Tends to matter more than the house itself.
Common questions readers send me
I already have a bamboo tube bee house. What should I do with the sealed tubes?
The tubes that are sealed with mud likely contain active cocoons. In late fall, carefully untie the bundle and lay the sealed tubes loose under a shrub or in a protected corner where they’ll stay dry but exposed to natural temperatures. The adult bees will emerge next spring on their own. The bamboo itself shouldn’t be reused. Compost or discard it, and replace with replaceable cardboard tubes for the next season.
Can I take cocoons out and place them in the yard? When is the best time?
Late October through mid-November is the typical window in most zones. The cocoons are tough and won’t break during gentle handling. Clean cocoons can be stored in a ventilated container in a garage refrigerator (35–40°F) until spring, then placed outside in the bee house or in dry wood crevices once the first native plants bloom.
Do I need to crack the cocoons open, or will the bees emerge on their own?
Leave them alone. Native bees emerge when temperatures and daylight give them the cue. Human help usually disrupts timing and kills the bee. The only work most gardeners do with cocoons is a visual inspection for pollen mite infestation. Discarding any cocoons with a greasy or sticky residue.
Which direction should a bee house face?
East to southeast, so the entry holes catch morning sun and the interior warms up to stimulate activity. Avoid facing south (too hot in summer afternoons), and never face north (too cool for eggs to develop properly). Mount at 3–7 feet off the ground, protected from driving rain.
Do I have to cut my flower stems down at all?
Not for the bees’ sake. Leaving the stems standing, cut to 12–18 inches in late winter or early spring (not fall), provides natural nesting cavities. The stubs left behind become next year’s bee habitat. Cut only what aesthetics or pathway access require, and save the rest for the bees.
A bee house, at its best, is a supplement to a wildlife-friendly yard. Not a substitute. The gardens that consistently support the widest range of native bees tend to have the same three things: a variety of flowering plants blooming across the whole season, a few patches of bare or sandy earth, and old plant stems left up long enough for the next generation.
If you do decide to keep a bee house, choose one of the three designs described above, commit to the fall cleaning routine, and pair it with the natural habitat features native bees need anyway. That combination is what actually moves the needle for the bees.
If this article was useful, feel free to pass it along to a friend who just hung up a new bee hotel. They’ll find it helpful before the next woodpecker discovers the same one.
Related reading on animalhabitats.online:
- The Foolproof Native Plant Garden Recipe (by USDA zone)
- Ground Nesting Bees in Your Yard
- How to Get Your Backyard Certified as a Wildlife Habitat (NWF Guide)
Related reading
Want More Wildlife Garden Tips?
Join 5,000+ nature lovers getting our weekly tips on creating wildlife-friendly gardens.
No spam, unsubscribe anytime. Privacy Policy
Emma Harrington
Emma Harrington is a wildlife habitat researcher and content editor with a passion for backyard conservation. She has spent over a decade translating ecological science into practical tips anyone can follow — from selecting native plants to building wildlife-friendly habitats. Her work focuses on helping homeowners transform ordinary yards into thriving ecosystems for bees, butterflies, hummingbirds, and other beneficial wildlife.