If you planted native seeds last year and watched almost nothing come up, you aren’t alone. And you probably weren’t doing anything wrong. The most common reason native seed packets disappoint isn’t bad soil, bad weather, or a bad gardener. It’s a biological step the packet almost never mentions.
This guide walks through cold stratification. The simulated winter that most native seeds need before they’ll even consider germinating. You’ll see the four practical methods gardeners actually use, species-specific timing for the most common natives (milkweed, coneflower, blazing star, baptisia), honest notes on what works and what quietly fails, and a realistic look at germination rates you can actually expect.
You don’t need a greenhouse, grow lights, or fancy equipment for any of this. Most of it works in a refrigerator, a milk jug, or a patch of bare soil. Once you understand why the seeds need what they need, the whole process becomes straightforward. And the germination rates go from frustrating to genuinely encouraging.
FREE: Wildlife Garden Starter Guide
Get our 12-page PDF with the 25 best plants for pollinators, simple habitat tips, and a printable checklist — all 100% free.
No spam. Read our Privacy Policy.Why most native seed packets produce almost nothing
A pattern shows up again and again in the reviews of native wildflower mixes. Several voices from that pool, all describing the same experience:
“Planted seeds in Pro mix under grow lights. Only one out of the entire pack germinated.”
“I bought these seeds especially for the milkweed but not one single milkweed plant has grown.”
“The description says annual and perennial flowers. NONE of mine came back, nor did the ones I gave to others.”
“This is a big sack of seeds, for me it was not a good buy. About 2 foot by 2 foot area had some very sparse growth, the rest did nothing.”
One buyer summarized the frustration in a single sentence:
“I wish the seeds came ready to germinate.”
They aren’t, and the reason is rooted in how native plants evolved. A seed that germinates the moment it hits warm, moist soil is a seed that might sprout in January during an unseasonable warm spell, only to be killed by the next frost. Evolution wired most native perennials with an internal “safety latch”: they require a period of cold and moist conditions, lasting anywhere from 30 to 120 days, before the embryo will break dormancy. That’s cold stratification.
Without that cold-moist period, most of the seeds in a packet simply sit in the soil, doing nothing. Sometimes they wait out the year and germinate the following spring after a real winter. Sometimes they die without ever sprouting. Either way, what looks like a gardener mistake is usually a process mismatch. The seed needed winter, and we gave it July.
Once the process is accounted for, germination rates for many species go from under 10% to near 100%. A gardener described their own turning point:
“Once I started putting my milkweed seeds in the fridge for 3 months (in moist potting soil), I’ve had nearly 100% germination.”
That’s essentially the whole difference.
What cold stratification actually is
Native seeds are responding to three conditions at once:
- Temperature. Typically 35 to 40°F, which is roughly the temperature of a refrigerator
- Moisture. Moist potting soil, vermiculite, or folded paper towel (not wet, not dry)
- Time, 30 days for easier species, 90 to 120 days for stubborn ones like baptisia
When all three are present for the right duration, enzymes inside the seed begin breaking down chemical inhibitors. The embryo becomes metabolically ready to sprout as soon as warmth returns. Miss any one of the three, and the seed simply stays dormant. Sometimes for years.
This is why the same packet of seeds can produce “nothing” the first year and surprise volunteers in the third. The seeds that didn’t germinate the first spring were often just holding out for a real winter, and they eventually got one.
The practical upshot is that every gardener working with native seeds needs to be giving them a simulated winter somehow. And there are four well-established ways to do it.
The four practical methods for cold stratification

Refrigerator stratification
This is the method most native bee keepers and milkweed enthusiasts use because it gives the most control.
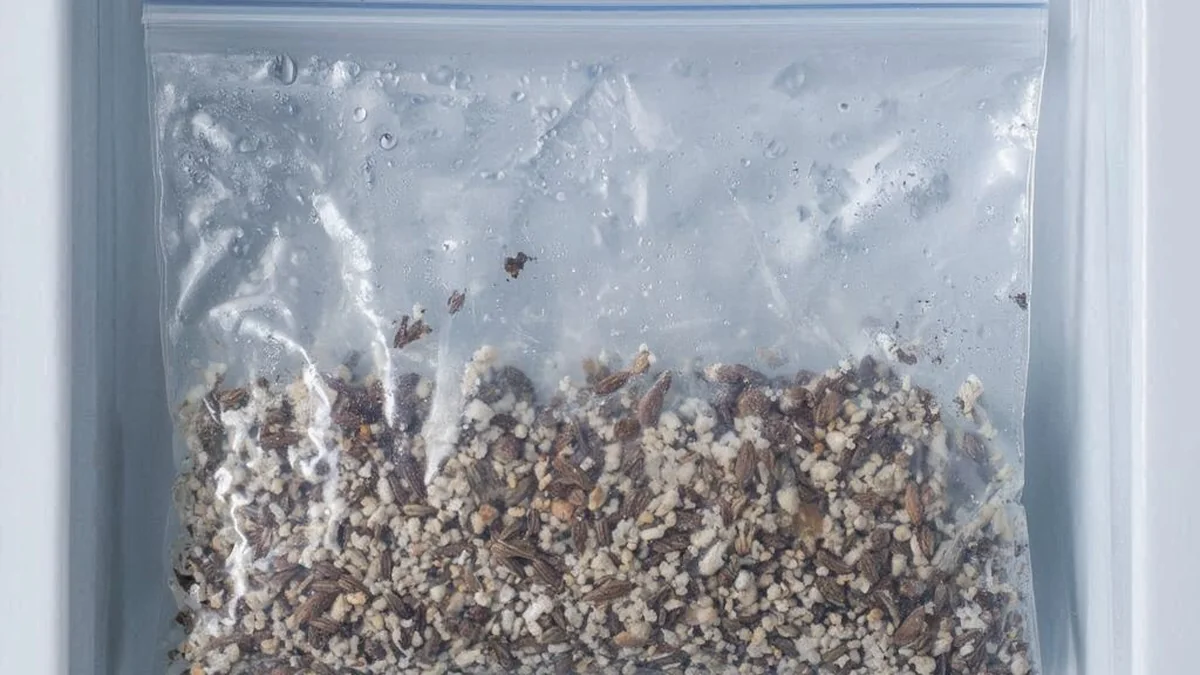
You take your seeds, mix them into a small bag of moist (not wet) potting soil or vermiculite, label the bag with the species and the date, and store it in the back of your refrigerator for however long the species requires. In spring, you pull the bag out and sow the contents into pots or directly into the ground.
A gardener described the basic version this way:
“Soak the seeds for 90 minutes, separate them out on a moist paper towel, seal them in a Ziplock, and leave them in the fridge for a month.”
And the milkweed-specific version:
“Putting my milkweed seeds in the fridge for 3 months (in moist potting soil), I’ve had nearly 100% germination.”
The advantages are precision and reliability. You control the timing exactly, so you can start seeds whenever outdoor conditions allow, and germination rates tend to be very high. The trade-off is fridge space for several months and the discipline to actually plant the seeds when the timer runs out.
Winter sowing in milk jugs
This is the lowest-effort method, and it scales well if you’re handling many species at once.
You cut a gallon milk jug around the middle, leaving a small hinge so the top flips open. Fill the bottom with a few inches of moist potting mix, sow your seeds, tape the jug closed (leaving the cap off for rain and ventilation), and set it outside in November through January. Then you essentially forget about it until spring.
Two practitioners described it:
“I bought seeds and have started them in milk jugs already.”
“I have two varieties of Shooting Star in my winter-sown containers.”
The jug creates a miniature greenhouse that mimics natural winter conditions. Cold, moist, with natural rain and temperature fluctuations. When warmth returns in spring, the seeds inside go through their natural emergence rhythm without any further human attention.
The method works best for species that need longer stratification periods (60 to 120 days), because the outdoor cold lasts long enough to do the job. It’s also forgiving. If you forget to check it for six weeks, nothing bad happens.
Direct fall-sowing onto bare earth
The simplest method of all. In late fall or early winter, you scatter seeds directly onto bare, weed-free soil, press lightly to ensure seed-to-soil contact, and walk away. Nature handles the stratification.
A homeowner in my county recounted their successful strategies for managing native plants:
“I planted these last fall, in November, in very poor soil. Though you’re not supposed to mulch these, as they need sunlight to germinate, I did lightly mulch them with straw over the winter. Then I gently finger-raked the bulk of the mulch off when the weather began to warm up but the ground was still frozen.”
And a contrasting experience from a less successful attempt:
“I put seeds (columbine and smooth blue aster) on top of snow this winter. I imagined them settling into fissures in the hardwood mulch and experiencing the conditions to sprout. Eh. Not so much. By that I mean zero. Reminder: bare mineral earth.”
The key requirement is genuinely bare soil. Mulch, cardboard, wood chips, or dense turf all prevent the seeds from reaching the soil and germinating. If the ground is prepared properly, this method is both free and effective. Swamp milkweed is one species that does particularly well with this approach:
“You can direct seed swamp milkweed after Thanksgiving and you will get plants the next year. They bloom the first year as well!”
Sand stratification (for very small seeds)
A less common method, but useful for tiny seeds that are hard to handle individually. You mix the seeds with slightly damp sand at about a 1:4 ratio in a lidded container, refrigerate for the appropriate duration, and sow the whole sand-seed mixture in spring.
This works well for species with dust-like seeds. Lobelia, gentians, certain grass species. Where individual handling would be impractical. It’s a niche method but worth knowing about for the right situations.
Species-specific stratification times
Different species need different amounts of time. Here’s a working table based on a combination of community recommendations and the Prairie Moon Nursery germination codes that most native gardeners treat as the reference:
| Species | Days of cold-moist stratification | Method that works well |
|---|---|---|
| Common milkweed (Asclepias syriaca) | 30–60 | Refrigerator or direct fall-sow |
| Swamp milkweed (Asclepias incarnata) | 30 | Refrigerator or fall-sow after Thanksgiving |
| Butterfly milkweed (Asclepias tuberosa) | 60–90 | Refrigerator (longer dormancy) |
| Purple coneflower (Echinacea purpurea) | 30 | Refrigerator |
| Blazing star (Liatris) | 60–90 | Milk jug or refrigerator |
| Blue wild indigo (Baptisia australis) | 120 | Milk jug (long winter required) |
| Joe-pye weed (Eutrochium) | 60 | Milk jug or refrigerator |
| Shooting star (Primula hendersonii) | 60–90 | Milk jug (benefits from outdoor cues) |
| Black-eyed Susan (Rudbeckia) | 0–30 | Often germinates without stratification |
| Wild bergamot (Monarda) | 30 | Refrigerator |
| Lupine (Lupinus) | Scarify + 30 | Nick seed coat, then refrigerator |
| Columbine (Aquilegia) | 30 | Refrigerator or direct fall-sow |
Two community recommendations that fit this pattern:
“Wait until the fall for scattering seeds”. A common piece of advice for blazing star, swamp milkweed, black-eyed Susan, and tall phlox.
“You can direct seed swamp milkweed after Thanksgiving and you will get plants the next year.”
Prairie Moon publishes a germination code (A, B, C, D, or combinations) for every species on their site. Code A means no stratification needed; B is cold-moist; C is warm-then-cold; D is double cold. Clicking any species on their site and scrolling to “Germination Code” gives you the definitive answer.
What works and what quietly fails
Several patterns show up reliably across gardeners who track their results.
What tends to succeed:
- Moist stratification for 30 or more days before spring sowing
- Bare mineral earth. Not mulch, not cardboard, not turf. When direct-sowing in fall
- Seeds from specialty native nurseries (Prairie Moon, Roundstone, Ernst) that publish species-specific germination information
- A light wheat-straw cover when direct-sowing to prevent seeds from washing away
A gardener who used the straw trick described the result:
“Twice I have had my yard dug up by machinery in separate sections and both times I have broadcast seed (Roundstone and Ernst) and am reaping the rewards. I laid down wheat straw from Home Depot to prevent seeds washing away.”
What tends to fail:
- Sowing indoors in spring with no stratification. Most natives simply don’t come up
- Seeds dropped on mulch or wood chips instead of actual soil
- Generic “wildflower mix” packets from big-box stores, where the species mix is unknown and stratification requirements are never listed
- Sowing over cardboard sheet-mulch that hasn’t decomposed. From a gardener who learned this the hard way:
“Seeded clover over soil and cardboard, but the cardboard didn’t break down. Come to find out, the cardboard underneath was still intact and stunting the clover roots.”
These aren’t rare edge cases. They show up in the reviews of almost every big-box wildflower product, which is worth keeping in mind when choosing where to buy seeds.
Where to verify stratification information
Three sources come up repeatedly as reliable references for native seed information:
“I know the seed resource I used that has a search function regarding germination times for Midwest natives was Prairie Moon Gardens. https://www.prairiemoon.com”
“xerces.org has a ton of great info on everything about milkweeds and Monarchs.”
“Also lots of good info here: https://www.monarchwatch.org/”
Prairie Moon Nursery publishes the germination code per species, along with recommended sowing seasons. Xerces Society has extensive information on milkweed selection by region and monarch-supportive gardening practices. Monarch Watch focuses specifically on monarch habitat and milkweed species selection.
Between those three, nearly every question about a specific native seed. From ideal stratification length to best sowing depth. Has a documented answer. Checking before buying tends to save a lot of frustration later.
A realistic look at germination rates and timing
One more thing worth setting expectations around: germination from native seeds is slower and more spread out than gardeners used to ornamentals typically expect.
In zones 5 through 7, first seedlings from fall-sown seeds typically appear in late April to mid-May. In zones 8 and 9, emergence often starts in late March. In zones 3 and 4, some species wait until early June. Even within a single species, individual seeds can germinate over a several-week window rather than all at once.
Germination rates vary widely by method:
- Fridge stratification tends to produce 70–100% germination for most species
- Milk jug winter sowing typically produces 50–80%
- Direct fall-sow onto bare earth often produces 30–60%. Lower per seed but you can sow more heavily to compensate
In practice, the gardeners with the most successful beds are usually the ones who combined methods. They fridge-stratify a small batch of high-value species like butterfly milkweed, they winter-sow longer-stratification species in milk jugs, and they direct-sow broader mixes onto prepared bare areas. Each method does a different job well.
Patience also helps. A species that hasn’t emerged by mid-May isn’t necessarily a failure. Many natives take a full eight weeks of warmth after stratification before the seedlings appear. Giving the bed until late June before drawing conclusions is almost always the right call.
Frequently asked questions
Can I just scatter some seeds directly on the ground?
If the area is truly bare mineral soil. Not mulch, not cardboard, not dense grass. Yes. Fall-sowing on bare dirt mimics natural cold-moist stratification and often works well for species like swamp milkweed, lupine, and columbine. If the area is lawn or weeds, the seeds need genuine soil contact to germinate, which means preparing the ground first.
I planted seeds in the fall. How long until I see something?
Roughly 4–6 weeks of warm weather after the last frost. In zone 6, that often means early to mid-May. Give it until the end of June before assuming the bed is empty. Some natives take 8+ weeks of warmth after stratification to emerge.
I planted wildflowers 5 days ago and watered every evening. Are these the early sprouts?
Almost certainly not. Five days is too early for most wildflower seeds, even without stratification requirements. What’s usually visible that quickly is weed seed from the existing soil, waiting for water. Daily watering also tends to encourage shallow-rooted weeds rather than the deep-rooted natives. Deep watering once a week is almost always better than shallow watering every evening.
Do I need to harden off seedlings before planting outside?
Yes, if they were started indoors or in a fridge-stratification setup. Hardening off takes 7 days of gradually increasing outdoor exposure. One hour of morning sun on day one, adding an hour per day, until the seedlings are outside full-time by day 7. Without this, they often sunburn immediately when moved outdoors.
What native seeds can I sow in May in Memphis?
By May in most of the South, the cold-moist window for perennials has closed for the year. Warm-season species that don’t need stratification. Partridge pea, black-eyed Susan, short-season wildflower mixes. Are the practical options. For species that require cold stratification, the best move is to begin the process in the fall and sow in the following spring.
Most native seed germination problems come down to one missing step, and it’s a step that packaging doesn’t usually mention. Once a gardener learns to give seeds the cold-moist winter they evolved to need, the same packet that produced almost nothing the first year often produces dozens or hundreds of seedlings the next.
If you have native seeds sitting in a drawer right now, pick one or two species, look them up on Prairie Moon’s germination code page, and start a simple stratification run this weekend. A small baggie of moist vermiculite in the fridge, labeled with the date, is most of the work.
If this guide was useful, feel free to share it with someone who gave up on native seeds after a disappointing year. A little information about the process tends to change everything.
Related reading on animalhabitats.online:
- The Foolproof Native Plant Garden Recipe by USDA Zone
- Plants That Attract Monarch Butterflies
- Mason Bee Houses That Actually Work
Want More Wildlife Garden Tips?
Join 5,000+ nature lovers getting our weekly tips on creating wildlife-friendly gardens.
No spam, unsubscribe anytime. Privacy Policy
Emma Harrington
Emma Harrington is a wildlife habitat researcher and content editor with a passion for backyard conservation. She has spent over a decade translating ecological science into practical tips anyone can follow — from selecting native plants to building wildlife-friendly habitats. Her work focuses on helping homeowners transform ordinary yards into thriving ecosystems for bees, butterflies, hummingbirds, and other beneficial wildlife.