Asian jumping worms (Amynthas and Metaphire species) thrash like snakes when touched, leave coffee-ground soil behind them, and can hollow out a native plant bed in a single summer. To stop them, identify adults in June or July using the mustard test, refuse any mulch or compost not heat-treated to 130 degrees Fahrenheit for three days, hand-remove worms into rubbing alcohol, and avoid sharing plants from infested soil. Spotted them in your yard last week and the bee balm is suddenly wilting? You are not imagining it. The grainy soil under the wood chips is the diagnostic.
Quick answer: Jumping worms are smooth, dark, fast-moving earthworms with a white, flush-to-the-body collar (the clitellum) about a third of the way down. Confirm with a mustard pour test, hand-pick adults into a sealed bag of rubbing alcohol, and stop the spread by sourcing only heat-treated mulch and refusing plant swaps from infested gardens.
A reader emailed last month asking why her two-year-old prairie planting suddenly looked like the deer had been on it. The leaves were fine. The soil was the problem. She had laid down a fresh six yards of “premium” bulk mulch in April, and by late May the top three inches of her beds looked like spilled coffee grounds. That is the textbook signature of an active jumping worm infestation, and the path from healthy native bed to wrecked seedling layer takes about ten weeks.
What do Asian jumping worms actually look like?
In June and July, adult jumping worms reach two to eight inches long and look glossy, grayish-brown, and metallic compared to the dull pink European nightcrawlers most gardeners recognize. The single clearest tell is the clitellum, the band-like reproductive collar found on all mature earthworms. On a nightcrawler the clitellum is raised, fleshy, and the same color as a darker pink saddle. On a jumping worm the clitellum is milky white, completely smooth, and wraps cleanly around the entire body without a bump. It sits about one-third of the way down from the head end.
FREE: Wildlife Garden Starter Guide
Get our 12-page PDF with the 25 best plants for pollinators, simple habitat tips, and a printable checklist — all 100% free.
No spam. Read our Privacy Policy.The behavior is impossible to miss once you have seen it. When uncovered, a jumping worm snaps and thrashes side to side like a small whip. Nightcrawlers wriggle slowly and try to burrow back down. Jumping worms launch out of soil, shed their tails as a defense (the tail keeps twitching while the worm escapes), and can travel several inches at a time across the surface of a bed. The University of Maryland Extension calls the motion “snake-like,” and that comparison is fair. If a worm in your mulch reacts to a fingertip by leaping rather than recoiling, it is almost certainly Amynthas.
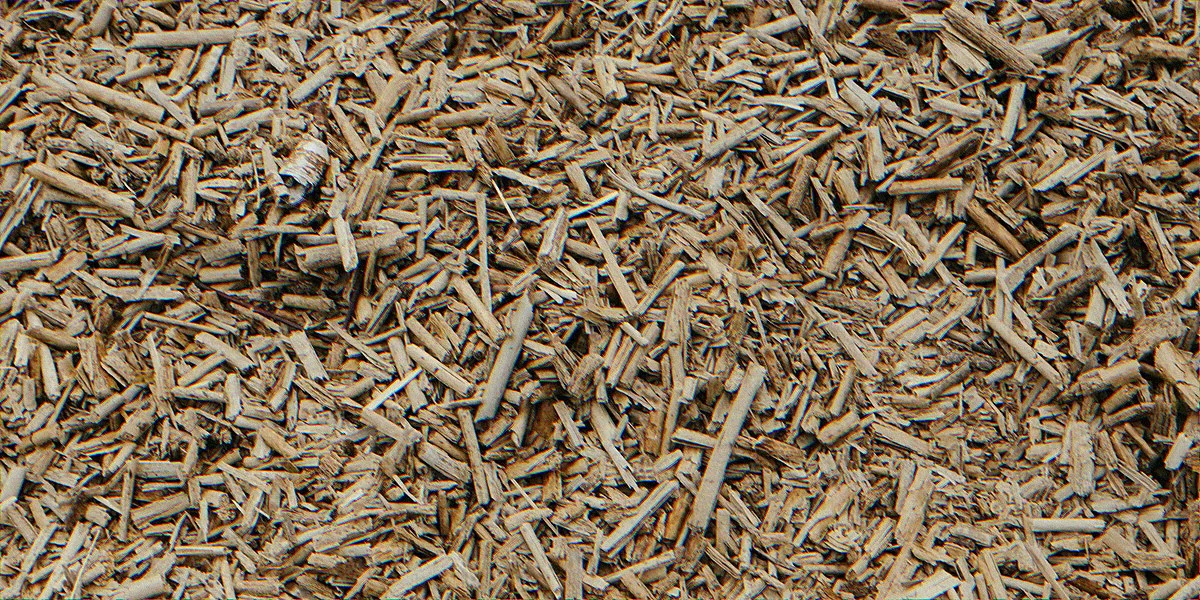
The soil they leave behind is the second diagnostic. Jumping worms feed on the entire organic layer (mulch, leaf litter, fine roots, micro-aggregates) and excrete it as dry, loose, granular castings the texture of used coffee grounds or dry taco meat. A healthy native bed with worm casts has clumped, crumbly structure. A jumping worm bed has a top layer that pours through your fingers and refuses to hold moisture. Where European earthworms tunnel down and pull surface material with them, jumping worms stay in the top two to four inches and process the buffet there until nothing is left.
Adults die at the first hard freeze, but they leave behind cocoons the size of mustard seeds, two to three millimeters across, dark, and indistinguishable from soil pellets at a glance. The cocoons overwinter happily at twenty below and hatch the following spring. This is why a yard that “lost” its jumping worms in November is back to a full infestation by Memorial Day, and why one contaminated mulch delivery can seed years of damage.
Why your native plantings collapse the year they arrive
The damage curve is steep and deceptive. In year one of a fresh infestation, you may notice nothing except a slightly grainier soil surface. In year two, seedlings that should have rooted will fail to anchor, mulch you laid in April will be gone by July, and any plug you put in shallow soil will rock loose in the wind. By year three, the upper soil profile is functionally gone. There is no organic matter left to hold water, no fungal network, no fine root anchorage, and no nutrient buffer.
Penn State Extension documents that heavily infested forest soils lose their entire duff layer within two to five years of jumping worm establishment. Backyard native plantings collapse faster because the volume of organic matter is smaller to begin with. A 200-square-foot pollinator bed amended with two inches of compost can be stripped to bare mineral soil by a single season of high worm density.
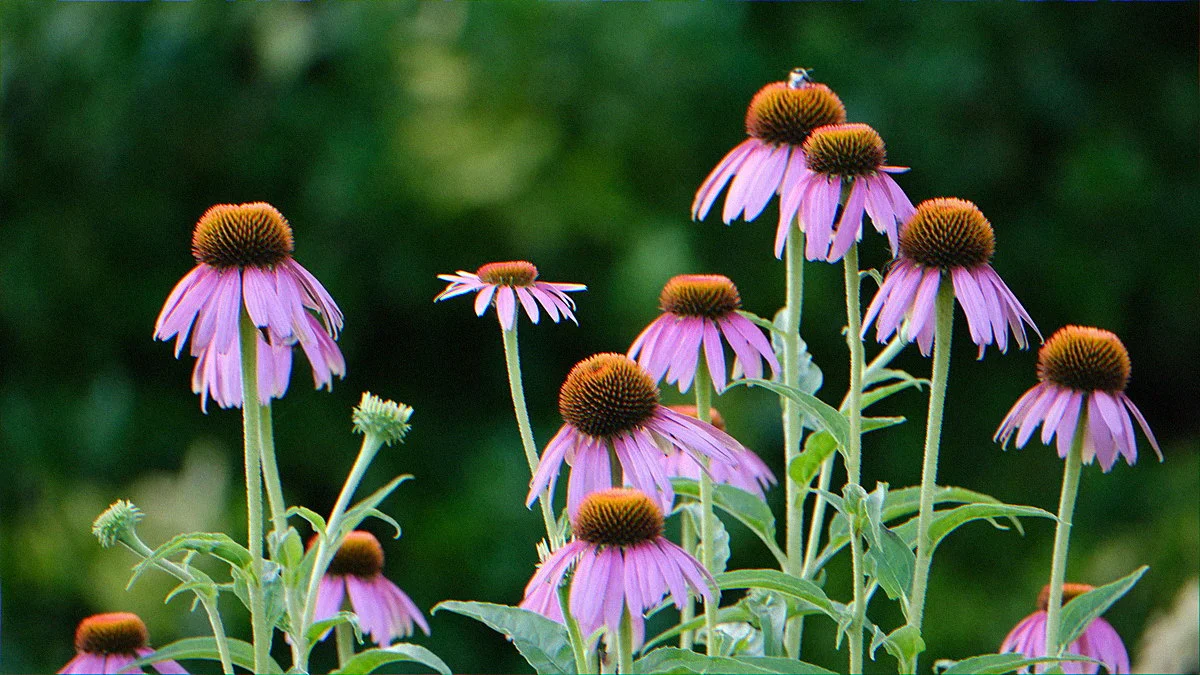
The plants most at risk are the ones you spent the most money on. Native plug-grown perennials (the $2 to $4 plugs from regional nurseries that gardeners buy by the flat) are particularly vulnerable because their root balls are small and they depend on the surrounding soil structure to expand into. When jumping worms eat the structure, the plugs sit in a void. Coneflower, milkweed, mountain mint, asters, little bluestem, and oak sedge are common casualties in the second year. Mature woody plants (serviceberry, ninebark, oakleaf hydrangea) tolerate the disturbance longer because their roots are already deep, but understory recruitment stops. No new oak seedlings, no new spring ephemerals, no replacement for plants that die.
The single most heartbreaking pattern in jumping worm yards is the loss of spring ephemerals. Trout lily, bloodroot, wild ginger, mayapple, and Virginia bluebells depend on a thick, undisturbed leaf litter layer for their seeds to germinate. Once that layer is gone, the parent plants persist for a few seasons on existing rhizomes and then disappear. There is no recovery without removing the worms first.

How do you confirm an infestation? The mustard test, step by step
The mustard test is the official confirmation tool used by extension services from University of Maryland Extension to Oregon State Extension. It works because mustard oil irritates worm skin and drives them to the surface within minutes. It does not harm plants, soil microbes, or the worms long enough to kill them, so you have to be ready to collect what comes up.
- Mix the solution. One-third cup of dry yellow ground mustard powder (the spice rack jar, not Dijon paste) into one gallon of room-temperature water. Whisk until fully suspended. Make a fresh batch for each test site.
- Clear a one-square-foot test patch. Pull back any mulch or leaf litter to expose bare soil. Pick a spot near visible casting damage if you have it; otherwise, test the edge of any bed you mulched in the last twelve months.
- Pour slowly. Drench the patch over a span of about thirty seconds so the solution soaks in rather than running off. Stand still and watch.
- Count for five minutes. Worms surface within one to three minutes. Anything that thrashes or jumps is Amynthas. Slow wrigglers are likely European species. Five or more jumping worms in one square foot is a confirmed infestation that warrants management.
- Collect, do not relocate. Pick up adults with gloved hands or tongs and drop them straight into a sealed plastic bag with rubbing alcohol or a bucket of soapy water. Bag the dead worms and put them in the trash, never the compost pile.
Repeat the test in three to five spots across the yard, especially anywhere you used purchased mulch, compost, or potted plants in the last two years. A single high-density patch usually marks the original introduction point. Knowing where they came in matters because that vector is probably still active.
Where they hitchhike in (and the bulk mulch trap)
Adults move only short distances, twenty to thirty feet a year under their own power. Every other foot of spread is human-caused. The top three vectors are bulk mulch and compost (especially commodity “double-ground” hardwood mulch from regional yards), nursery plants sold in soil that was made from contaminated yard waste, and gardener-to-gardener plant swaps. Sharing a clump of divided phlox with a neighbor can also share a few dozen cocoons clinging to the root ball.
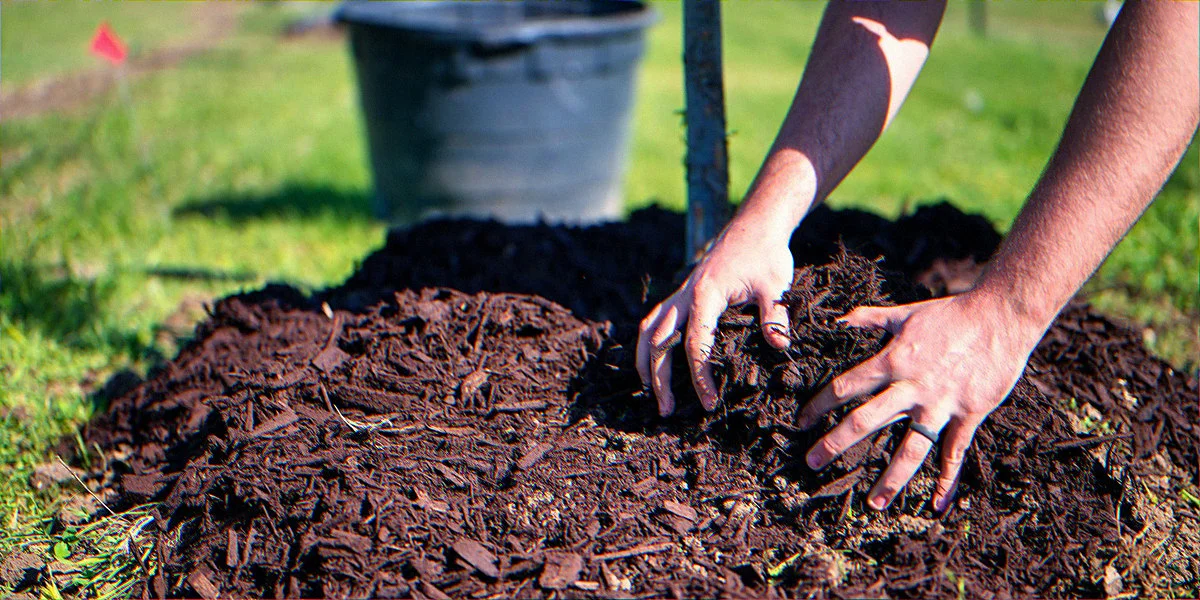
Bulk mulch is the worst single vector because the volume is large and the price pressure is high. Most commercial mulch is produced from a feedstock pile that includes municipal yard waste, storm debris, and landscaper rejects. If that pile is not actively composted to internal temperatures of 130 degrees Fahrenheit for at least three consecutive days, the cocoons survive and ride along into your beds. The mulch I get from a heat-treated source costs about 30 percent more per cubic yard than the cheap stuff at the road-edge garden center. That premium is the price of not poisoning your soil for three years. We covered the specific questions to ask a mulch supplier in our piece on how to inspect bulk mulch before they dump it, including what a properly heated pile looks like on the inside.
Nursery plants are the second vector, and unfortunately the local native plant nurseries you most want to support can be among the worst offenders. Their potting media often comes from regional composting operations and is not always heat-treated. Before buying, ask the nursery directly: do you heat-treat your potting medium, and at what temperature for how long? A nursery that does not know the answer is one to avoid for at least this season. A nursery that gives a confident answer (typically “yes, our compost supplier hot-composts to 140 degrees”) is your safest source.
Plant swaps are the most emotionally fraught vector. Sarah-style native plant gardeners propagate and trade aggressively, both for cost reasons and as community-building. When you accept a divided clump from a friend whose yard has jumping worms, you almost certainly accept cocoons. The fix is not to stop swapping. The fix is to bare-root every shared plant: wash all soil off the roots in a bucket of clean water, dispose of the wash water far from any planting area, and replant in fresh, known-clean medium. If you read our guide on propagating and sharing native plants with neighbors this spring, this bare-root step is the most important addition to that workflow for anyone east of the Mississippi.
Can you actually kill jumping worms in an established bed?
The honest answer is partial. There is no chemical pesticide that selectively kills jumping worms without devastating the broader soil community, and any product that did would also be banned for non-target effects on the native earthworms, salamanders, and beneficial nematodes you want to keep. (Pesticides marketed for “soil pests” are a separate problem we cover in how to spot pesticide-treated plants at nurseries; the short version is they kill what you want to protect.) That leaves three management options, all imperfect, used in combination.
| Method | What it kills | Effort | Best for |
|---|---|---|---|
| Hand removal during mustard test | Adults only | 30 min per bed, weekly June–August | Small beds, early-stage infestations |
| Solarization (clear plastic, full sun) | Adults plus cocoons in top 4 inches | 4–6 weeks of bed downtime | Empty beds awaiting fall planting |
| Heat-treated soil amendments + bare-rooting | Prevention only | Ongoing sourcing discipline | All beds, all year |
| Tea seed meal (saponin) | Adults, sometimes | Costly, regulated, not labeled for jumping worms | Research plots only, not home gardens |
| Diatomaceous earth in mulch | Anecdotal, unreliable | Low | Skip, evidence is weak |
Solarization is the only tool that reliably kills cocoons in the top few inches of soil, and it requires giving up the bed for a full month and a half during the hottest part of the year. The protocol from Michigan State Extension calls for clearing plants, raking the bed flat, soaking it thoroughly, covering with one or two layers of clear (not black) six-mil plastic, and weighing down the edges with soil or boards. Soil temperatures need to hit 104 degrees Fahrenheit for at least three days to kill cocoons. In most of USDA zones 5 through 8, July works. North of that, the window is narrow and you may need to combine it with raised black metal beds that hold heat longer.
The neighborhood I know best in central Iowa ran a coordinated solarization on five infested yards in 2024. Three of the five came back clean enough to replant safely the following spring. The two that did not had clay subsoil that capped the heat at ninety-five degrees and never got hot enough to kill the cocoons. The lesson is that solarization is local: it works on sandy or loamy soils with good drainage, and it sometimes fails on heavy clay.
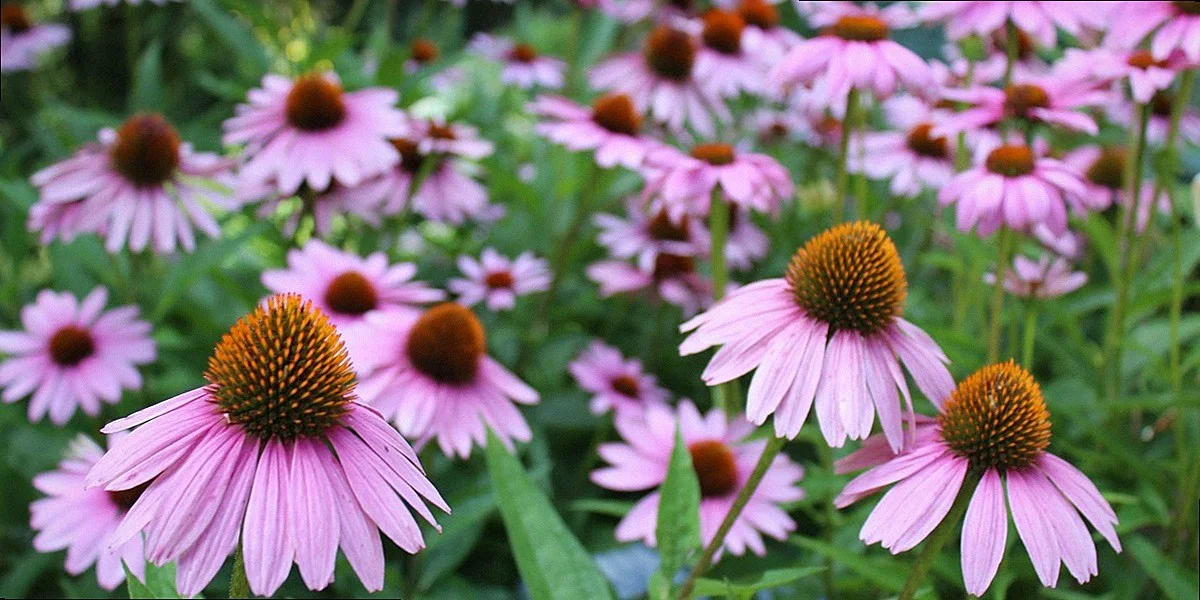
Replant smarter: natives that bounce back from disturbed soil
Once a bed is mostly worm-free and you have stopped the inbound vectors, the question is what to put back. The honest answer is: not the spring ephemerals, at least not yet. Bloodroot, trout lily, and Virginia bluebells need a stable leaf-litter layer that will take three to five years to rebuild. If you replant them too early, you are funding the next round of disappointment.
The natives that handle disturbed, low-organic soil best are the ones evolved for prairie and meadow conditions: deep-rooted, drought-tolerant, and tolerant of poor structure. Switchgrass (Panicum virgatum), little bluestem (Schizachyrium scoparium), butterfly weed (Asclepias tuberosa), purple prairie clover (Dalea purpurea), wild bergamot (Monarda fistulosa), and prairie smoke (Geum triflorum) all root deeply enough to bypass the worm-impacted top layer within their first season. Plant them as plugs in fall after the cocoons have stopped hatching, water them in well, and mulch only with a thin layer of certified-clean wood chip or, better, no mulch at all.
For a rain garden in the same situation, our three-zone native plant rain garden recipe already favors the deeper-rooted species that recover well from disturbance. The same plant list works for any worm-impacted bed where you want a denser planting that out-competes weeds while the soil rebuilds.
Skip woodchip mulch for at least one growing season after replanting. It will get eaten faster than you can replenish it, and the worms that survived solarization will be drawn to it. Use a thin cover of pea gravel or coarse mineral grit instead. It is not as pretty as a deep cocoa-brown mulch ring, but it suppresses weeds without feeding the infestation, and it lets the plants you actually want do the work of covering the ground. By year two, the plants themselves should provide the ground cover and the mulch question becomes academic.
For a longer planning view of how natives establish across multiple seasons in less-than-ideal soil, the framework in our sleep, creep, leap guide to native plant growth applies double on worm-disturbed beds. Year one looks like nothing is happening above ground because all the energy is going into roots reaching past the damaged zone. Year two starts to fill in. Year three, if you have done the prevention work, looks like a real garden again.
What if my neighbors don’t believe me or won’t act?
This is the hardest part, and the persona research backs it up: native gardeners describe the social cost of trying to convince a HOA-minded neighborhood that their “weird grainy mulch” is actually an ecological emergency. The neighbor with the immaculate lawn does not believe that worms can wreck soil. The HOA board does not consider invertebrates a real category. And the landscaping company that just dumped six yards of cheap mulch on the cul-de-sac is not interested in your mustard test.
The argument that lands is the property-value framing, not the ecology framing. Jumping worm infestations reduce the soil’s ability to hold lawn grass too. Heavy infestations cause bare patches in turfgrass, water pooling and runoff during rain events, and trees that lean because their fine surface roots have lost their anchoring matrix. You can show this with a single mustard test on a neighbor’s lawn near a tree (with permission). When five jumping worms surface in thirty seconds, the conversation changes. We covered the language and framing that works on HOA boards in our piece on HOA letters about native gardens; the same script (property values, water management, professional sources) works for jumping worms.
What does not work is leading with the words “invasive species” or “ecological collapse.” These trigger defensive eye-rolls in the audience you most need on your side. Lead with the visible damage: thinning lawn, mulch disappearing in eight weeks instead of two seasons, sprinkler runoff increasing. Then offer the demonstration. Then mention the source: a state university extension publication is what closes the conversation. If your neighbor wants to confirm with their own source, the Penn State Extension factsheet and the University of Maryland Extension page are the most accessible.
If you live in a covenanted community where the HOA chooses the mulch contractor, that is your highest-leverage conversation. One bad mulch order can contaminate every front bed on the street in a single afternoon. Ask the board (in writing, with the extension publications cited) to require a heat-treatment certification from any future mulch supplier. The cost increment is small (10 to 30 percent per cubic yard) and the alternative is paying for landscape replacement in five years.
FAQ
Will jumping worms eventually leave on my own if I stop adding mulch?
No. Adults die at the first hard freeze each year, but cocoons survive winter and hatch the following spring. A bed with no new inputs will still produce a fresh generation of worms for at least three to five years from existing cocoons before the population starves out. Active removal during the adult phase plus solarization of empty beds is the only way to actually shorten that timeline.
Are jumping worms the same as red wigglers in my compost bin?
No. Red wigglers (Eisenia fetida) are a different species, do not survive outside compost-pile conditions in most North American climates, and do not damage native landscapes. Jumping worms are Amynthas and Metaphire species, easily distinguished by the smooth, flush-to-the-body white clitellum and the snake-like thrashing motion. If you run a vermicompost bin with red wigglers, keep it contained and do not turn it out into your beds. The bin contents themselves can carry jumping worm cocoons if you ever added outside leaves or soil.
Can chickens or birds control jumping worms naturally?
Partially. Chickens, robins, and other ground-foraging birds eat adult jumping worms readily and can reduce visible populations in small areas. They do not touch the cocoons, which are the long-term problem. Encouraging more bird activity in your yard (which the bird-friendly habitat guides on this site cover in depth) helps but does not solve the infestation. Treat birds as a supplement to mustard testing and solarization, not a replacement.
Should I report jumping worms to my state agriculture department?
Yes in most states. About thirty US states now have monitoring programs and many ask for citizen reports through iNaturalist or a state-specific portal. Reports help extension services map spread and target outreach to nurseries and mulch yards. Reporting is voluntary in most jurisdictions and does not trigger any enforcement action against you personally. The form usually takes under five minutes.
Does mulching with leaves instead of wood chips prevent jumping worms?
Slightly. Whole leaves are a less attractive food source than ground hardwood mulch, and a thick leaf layer applied in fall takes longer for the worms to process. But shredded leaves behave more like wood chips and disappear at similar rates in heavy infestations. The bigger issue is sourcing: if you bring leaves in from a neighbor’s truckbed, you risk importing cocoons. Use only leaves from your own (tested) yard, or leave the autumn leaf layer in place where it falls.
Want More Wildlife Garden Tips?
Join 5,000+ nature lovers getting our weekly tips on creating wildlife-friendly gardens.
No spam, unsubscribe anytime. Privacy Policy
Emma Harrington
Emma Harrington is a wildlife habitat researcher and content editor with a passion for backyard conservation. She has spent over a decade translating ecological science into practical tips anyone can follow — from selecting native plants to building wildlife-friendly habitats. Her work focuses on helping homeowners transform ordinary yards into thriving ecosystems for bees, butterflies, hummingbirds, and other beneficial wildlife.